From the Lean Six Sigma Briefcase
Cross Functional Program Case Study
Rapid Response Problem-solving on a Customer’s Field Return
Part I: When the Customer says, "Jump!"
Working in the Electronic Manufacturing Services (EMS) business makes for some interesting times, as in the apocryphal saying, “May you live in interesting times.”
One interesting time I recall involved a product designed by MoonGeo (not their real name), a US-based late-stage startup company, who had contracted with the EMS (my employer) to produce products according to their design. We (the EMS) established a cross functional program to set up and run the production process to build and ship product.
MoonGeo’s terms with the EMS involved MoonGeo taking delivery of assembled and tested product from the EMS, warehousing it pending a customer order, then delivering and installing it for that customer. The product was an electromechanical cabinet assembly with AC power and DC backup battery connections, and a custom control system for the unit. MoonGeo’s typical customers were small business installations, and the units ranged in price from about $9,000 to over $15,000.
About 4 months after we started up the production process and had it running pretty smoothly, we had a call early one Tuesday morning from the MoonGeo CEO informing us that a unit they had delivered to one of their customers had an out-of-box failure (OOBF) for a loose front panel power switch. They were going to send a replacement from their stock to their end customer, and were returning the OOBF unit to us for failure analysis and corrective action.
The customer CEO called the EMS supplier’s division General Manager directly; since the GM was in California and the CEO was on the east coast, the call was at 5:25AM Pacific Time. Naturally, the GM did not hesitate to call his leadership team to share the news, starting at 5:26AM. So our “interesting time” actually began before breakfast – even before the morning alarm clock for most of us!
Driving to the plant that morning, my thoughts were focused on how that power switch is installed into the product cabinet, and the assembly, inspection, and testing process in the plant. It is sometimes difficult to conceive of how such a glaring error as described by the MoonGeo CEO could occur; it was going to be important to do a couple of things quickly. First, expedite the return of the defective unit so that we could precisely define the problem and so we would have the “forensic evidence” to help us determine the most likely cause of the process escape. And second, take a sample of units currently in the production floor and in Finished Goods to determine if any others had the same defect, and perform a proper containment for the problem.
We were fortunate to have a cross functional program team of people in the division who were well-versed in problem-solving methodologies, so we were not in danger of having someone “shoot from the hip” – try to quick-fix the problem without first fully understanding it.
There are several tools or methods that can be used; our preferred methodology for addressing field quality problems was (and still is) the ‘8 Disciplines’ or ‘8D’ approach. As the name implies, it is indeed a disciplined, systematic approach, and it involves pulling together an Action Team of people who have either relevant subject matter expertise or strong general failure analysis and statistical knowledge. Together, they follow a prescribed sequence of steps to derive the root cause(s) of the problem and implement corrective actions to preclude its recurrence. The methodology was originally developed by the U.S. Department of Defense and adopted by Ford Motor Company. 8D continues to be widely used to deal with quality and safety issues.
The steps in the 8D are laid out in a specific order, on a form designed specifically for the purpose, as shown in the accompanying graphic of our completed 8D. The eight steps or disciplines are as follows.
Electronic Manufacturing Services are companies whose business is to manufacture and perform related services in support of their customers’ products. Sometimes referred to as contract manufacturers, their business models have expanded well beyond production, to include design services, verification testing, direct fulfillment to end customers, and others.
D0: Prepare for problem solving (background information).
D1: Define the Problem-solving team.
D2: Define the problem.
D3: Decide and implement containment actions to keep the problem from spreading.
D4: Determine potential causes and identify likely root causes.
D5: Decide and verify Corrective Actions to mitigate the root cause.
D6: Implement and validate the Corrective Actions.
D7: Identify any necessary Preventive Actions, to prevent recurrence of the problem.
D8: Cross functional program 8D team recognition and close.
Part II: Using the 8D Framework to Find Root Cause
MoonGeo’s end customer was in Tennessee so getting the unit to our California plant was expected to take 3 days, until Friday morning. We asked the customer to take some photos of the unit that would show the defect, if possible, without doing any disassembly that might alter the evidence we would need in order to analyze the failure. And we got the EMS corporate Logistics team involved with the customer’s carrier to try to improve the return delivery time.
While awaiting the OOBF unit return, the cross functional program team got started on the 8D mid-morning the same day.
J.M., the Program Manager responsible for the MoonGeo account, had all the pertinent information about the unit: its serial number, manufacturing date, ship date, and the customer’s statement of the failure. J.M. put that information into an 8D form before the meeting began, pending confirmation after the unit hit our dock. This step, called ‘D0’ (read ‘D zero’) on the 8D form, was completed by 9:45 AM, a little over 4 hours since the first notification.
Meanwhile, J.M. had contacted 6 people in the EMS plant with the requisite job functions, skills, and knowledge to form the 8D Action Team; most of us were already aware of the issue. This is step D1 in the 8D process.
The 8D Action Team consisted of:
A.B. – Process engineer for the MoonGeo production line.
J.W. – Production supervisor for the MoonGeo line.
H.N. – Test engineer for the MoonGeo line.
H.D. – Quality engineer (QE) for EMS division.
F.N. – Lead technician for the MoonGeo production line.
J.M. – EMS Program Manager responsible for the MoonGeo account.
D.G. – Engineering/Project manager for EMS division.
The 8D meeting kicked off at 10:15 AM, and lasted about 2 hours, covering the second, third, and fourth disciplines in the 8D regimen.
D2 – We drafted a definition of the problem, noting that our statement was to be considered preliminary until the unit was received and the problem confirmed by evidence.
(Prelim) Problem: Unit S/N 16031 received by a MoonGeo end customer in Tennessee was found to have Power Switch ‘S7’ loose.
D3 – Containment actions proceeded immediately; first, a line stop; and second, inspecting all units in production Work in Process (WIP) to ensure S7 was properly installed and all screws torqued. Third, determine how many units are in Finished Goods Inventory (FGI), and prepare to unpack and inspect 100% for the S7 installation and proper screw torque.
D4 – We scheduled a team meeting to begin identifying possible causes of the problem, based on the verbal information and photos received from MoonGeo. The D4 would be considered preliminary while awaiting the return of the OOBF unit, and possibly revised after examining the returned unit. It is important to use physical evidence to determine the failure root cause with high confidence, rather than assuming that the information communicated from others is complete and accurate. The first D4 meeting was held Tuesday from 2:30 to 4:00 PM, then adjourned until after receiving the return unit.
While awaiting the return, production line people were made aware of the customer OOBF, and the Manufacturing Process Instructions (MPI) were reviewed by the production lead, the process engineer, and the QE. The focus of their review was to identify procedure steps that might have led directly or indirectly to the failure, and whether any step, if overlooked or performed incorrectly, could have led to the failure. They did identify several steps in the assembly process for deeper investigation as part of completing task D4 in the analysis.
The failed unit was received on Thursday at 4:25 PM, about half a day before originally expected, thanks to frequent communication between MoonGeo and EMS logistics people. J.M., the Program Manager, met the truck at Receiving and observed as it was unloaded. He noted that the original packaging had been re-used for the return trip, and did not appear damaged. The rest of the 8D team soon joined him at the Receiving area to unpack the unit carefully. The QE took photographs as the unit was unpacked to document the procedure.
After unpacking, the unit was moved from Receiving to the Production area for further analysis. The first task was to confirm the failure as communicated by the customer and identify any other relevant defects or anomalies before proceeding further.
After thoroughly inspecting the OOBF unit, the problem definition was amended to state:
Problem: Unit S/N 16031 received by a MoonGeo end customer in Tennessee was found to have Power Switch ‘S7’ loose. 3 of 4 screws had nuts and lockwashers missing. The screws were still inserted in the slots of the ‘S7’ component. One screw still had the lockwasher and nut attached, but not torqued per specification. The parts were all located, found loose in the bottom of the cabinet.
Though the last sentence sounds trivial, this is actually useful information, indicating they most likely had been assembled when the unit was manufactured, and then came loose at a later time.
Friday morning 8:00 AM, the 8D Action Team met again. The first order of business was to review the containment actions from step D3. A physical count showed 9 units complete in FGI and 14 units in production WIP that had the S7 switch installed. The FGI units had been unpacked and inspected on Wednesday, including a check of the torque on S7 screws, and all 9 units were found to be correct. Torque marks were applied to the screw heads, since the nuts were not visible behind the panel after being installed.
The 14 units in WIP were all at an early production stage, at which the S7 part was installed but attached hand-tight, because the fit of the front panel opening around S7 required some adjustment; the front panel assembly was one of the last steps in line. This fact was noted clearly by the Action Team, and later would figure prominently in the root cause determination.
The team continued where we had left off Tuesday with discipline D4 to determine root cause(s) for the problem. H.D., the Quality Engineer, suggested using a Cause-and-Effect diagram, also called a fishbone diagram, to document the possible causes, then determine the most likely root cause.
We chose to do this exercise at the Production floor with the OOBF unit in front of us, using a large whiteboard to capture ideas. Having the physical “forensic evidence” in front of us helped inspire some good ideas concerning possible causes that had not occurred to us three days prior in a conference room. The team brainstormed and debated for over an hour, then adjourned to mull the ideas before resuming in the afternoon for another hour.
The resulting fishbone diagram, transcribed from the hand-written whiteboard, is shown in the nearby graphic. The red ellipses highlight the most likely causes we determined after a short but lively discussion.
The conclusion based on all the evidence available was that the cause of the failure was a combination of a specified process operation plus a human error at a downstream process step that combined to produce the defective result. The switch S7 is installed onto a chassis that is later mounted into the cabinet. The screws and associated lockwashers and nuts are assembled hand-tight at first, because at the last process step, a protective panel is installed that has a cutout for the S7 switch to make it accessible to the end user. The switch fit relative to the cutout required some adjustment during assembly, which was facilitated by having the S7 assembly as well as the panel attachment screws only hand-tightened at first. After fitting, the final assembly instruction was to torque the S7 screws and the panel attachment screws to their specified torques.
Based on the evidence, we concluded that the final torquing was not done for S7 in the OOBF unit, and the parts worked loose somewhere in transit from the California EMS plant to the MoonGeo warehouse and eventually to the end customer’s facility.
Our General Manager was involved with us in the Friday afternoon session at which this root cause was determined. After asking enough probing questions and hearing satisfactory answers, he phoned the MoonGeo CEO (with us still in the room) to let him know what we had found. The CEO was mildly satisfied, and of course wanted to know – soon! – what we would do about it, and thus it became clear our “interesting time” was destined to continue into the night and probably on Saturday.
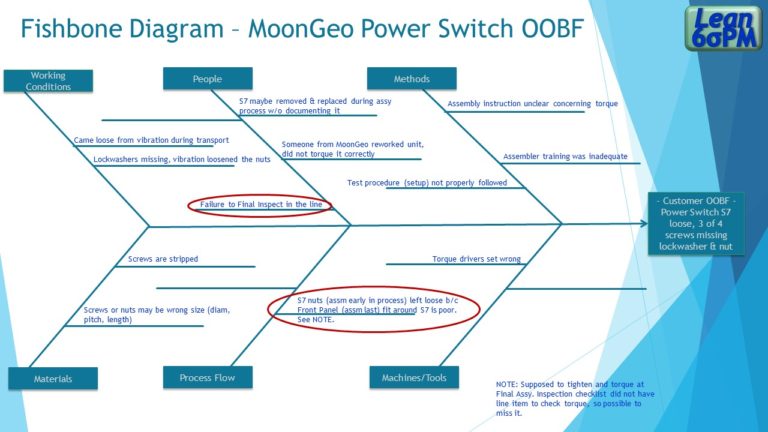
Cause and Effect, or Fishbone diagram for the MoonGeo OOBF problem. The red ellipses identify the potential causes which the 8D Action Team determined to be root causes of the problem.
Part III: Putting CA/PA in Place
The pizzas our GM ordered for sustenance arrived around 6:45 PM Friday evening. By then we were well into the D5 discipline, to determine the best Corrective Actions (CA) to put in place, to make sure no units would ever again leave the factory with a loose S7 switch. Later we would expand that in the Preventive Action (PA) discipline to cover other similar potential problem areas, but first things first.
The crux of the problem was that torquing the lockwasher and nut to each screw at Final Assembly had to be done blind, since the S7 part was flush mounted to an interior chassis, and the parts were obscured to the assembly technician. The 8D Action Team had discussed the product design and assembly fit issues for the past 3 days; after some consideration of process time and complexity, and actually trying a couple of ideas on a unit in WIP, we settled on two Corrective Actions (CA) for the S7 attachment problem.
CA#1 – Add an item to the Final Assembly checklist to read “Torque 4 screws, lockwashers, and nuts, previously assembled hand-tight on S7, to 28 in-lb. Apply torque marks on the heads of the 4 screws, since the nuts are not visible after assembly.” {See Sidebar}
CA#2 – Perform weekly Out-of-Box Audits (OOBA) in Finished Goods for MoonGeo production, with a sample size determined by that week’s production quantity.
In an OOBA, 1 or more units that have been completed and packed in FG awaiting shipment are selected at random, then unpacked so that critical customer attributes can be re-inspected. If defects are found, the unit must go back to Production for correction, and the audit sample is increased until the process is back in control. A well-designed OOBA will give the manufacturer a good sense of customer-perceived quality.
The two CAs were drafted and wordsmithed by 10:30 Friday night, so we called it a day and let our GM know the plan. Saturday was devoted to writing the formal procedures and preparing the training information for the Production people so that we could roll out the changed procedures first thing Monday.
Implementing the CAs is discipline D6. J.M., J.W., and A.B., the Program Manager, Production Supervisor, and Process Engineer respectively, had the responsibility to conduct the training, while H.D., the Quality Engineer, wrote the OOBA procedure and piloted it on one FG unit. A busy Monday.
On to D7, Preventive Actions (PA). Based on the past six days of intensive review of MoonGeo units, the Action Team put forth 3 Preventive Actions.
PA#1 – Add separate inspector (temporarily) at Final Assembly so the assembler is not also doing the inspection. (Second set of eyes)
PA#2 – Initiate a process improvement kaizen project to develop a poka-yoke or mistake-proofing technique for S7 installation. Implementing this PA was intended to eliminate the need for the added inspector. A.B., the process engineer and F.N., Production lead technician, volunteered to work with MoonGeo design engineers on this.
PA#3 – Review the final assembly and determine if any other components have a similar exposure to being improperly attached. Add a requirement for torque-marking other critical screws and nuts for quick visual inspection.
The last discipline, D8, to close the 8D activity and congratulate the Action Team, took place on Thursday morning, with a few inspirational words from our GM. Back to the day-to-day activities involved in serving all our customers, with a bit of new knowledge to apply when the need for focused problem-solving arises again.
Torque Marks are marks made with indelible ink or paint after a screw and nut, or equivalent fasteners, have been properly torqued. They serve as an indication that the proper torque has been applied, since there is not a way to inspect or test it otherwise.


A Final Word about this Case Study
Simple problem, simple fix, right? I picked this incident on purpose because at first blush it does look simple. The parts fell off because they were not put on correctly. Fix them.
And in fact that’s the way many businesses treat simple, and even some complex, problems – throw them back at the production operators, tell them to fix their mistakes.
Experienced Lean Six Sigma businesses take a different approach. Every failure, especially for product in the field, is a learning opportunity. Lean Six Sigma teaches people that “Find the defect, fix the defect” is incredibly short-sighted. It’s a good way to ensure a continuing supply of defects, accompanied by dwindling demand from customers.
The 8D approach emphasizes to the disciplined Lean Six Sigma team to follow the process; just as Standard Work is beneficial for production operations, so is it beneficial for failure analysis, root cause analysis, and corrective action. All of us involved in the EMS 8D Action Team understood that we would follow the 8D procedure; no question about it, it was in our DNA. The exercise of filling out the form (“Standard Work” in the Lean Six Sigma lexicon) ensures that those 8 specified steps, which experience has demonstrated to be effective, will be followed. Corrective and Preventive Actions will be put in place to eliminate the source of the problem, not just “fixes” plus a lot of “wishin’ and hopin’.”
Try using the 8D this week or next on a real life problem you encounter, even if you think you already know how to fix it. Use it as a learning opportunity for junior people in your organization, and include people who are maybe not yet subject matter experts but who could benefit from the learning and become solid contributors given the chance.
And remember, the ‘D’ in 8D means Discipline; have the discipline to follow through even when it feels rote and simplistic. Practicing ‘8D’ on a few simple issues will help you enormously sometime in the future when a complex problem crops up on a random Tuesday morning. Long-term success results from doing basic things repetitively until they are second nature.
Welcome to the exciting world of Lean Six Sigma! May you, too, live in interesting times.
Feel free to contact me to discuss the 8D approach or the other tools described in this report, and how to bring the benefits of Lean Six Sigma to your current project.
~ Dann